
As delicious as this beetroot soup was to eat, it was challenging to shoot so I’m going to take you through my process of getting to a final photograph that I am happy with. This is a very honest account of how I work. A lot of it is trial and error, but I like to write notes after each shoot and keep an account of what worked and what didn’t. Sometimes I get it right first time and sometimes as with this shoot it takes a few tries. Everyone is different and has a different workflow, but hopefully you will gain some valuable insights here.
1. When I shoot I conceptualize it in my head first. I used to draw it out on paper, but I find that being adaptable as you go is best.
I think of some fundamental elements like how the colour of the dish, the texture of the food, props, boards I use will work together, what angle would best work for this particular food, what story do I want to tell and how I will compose the image.
2. For this shoot I initially wanted to compose the shot with 3 bowls of soup in a crate to give a rustic, country feel, shot from overhead. So firsts things first before I plated up I did some test shots setting up my styling and getting my camera settings right. I do this a lot and it’s always to just to get a rough idea of what the shot is going to look like.
I typically don’t shoot using a tripod because I prefer to move around the set more freely and I shoot mostly in great natural light, but I do want to start using a tripod more and shoot tethered.
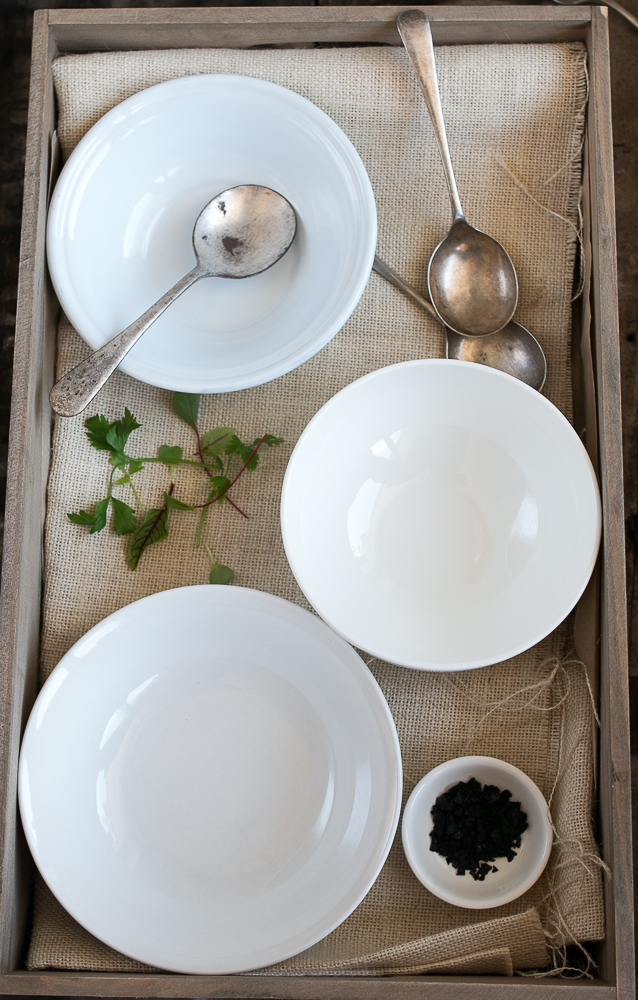 3. Then I brought through everything I needed from the kitchen into my studio ( our second bedroom, come office, come baby’s room – the only room in the house with a North facing window and great natural light) and started to plate the soup.
It’s very important with soup that you have your composition right from the start because moving around bowls of soup gets messy and causes the soup to move within the bowl and it can be very hard to wipe the edges and have it still look good.
If you do need to touch up the edges of the soup in the bowl use a Q-tip, hold it directly down against the side of the bowl and turn it as you wipe along the side.
Food often doesn’t stay fresh on set for long and you have to work quickly to get the best results so having everything you need on hand is very important even if your space may feel quite cluttered for a while.
I like to have another table off to the side so that once I am happy with the shot I can move everything I’m not using to the other table and have a clean space to shoot in. It is also a good idea to have enough soup to do a test bowl before you start to plate up the rest.
 4. I knew that using some green micro herbs would compliment the pink beetroot and provide texture and movement to the shot. I also added some sunflower seeds and thinly sliced radishes.
The recipe calls for a dollop of yogurt to serve and swirling through the yogurt can look beautiful, but once I had everything in the bowl it wasn’t working for me.
There was too much going on with the garnishes and the yogurt failed to swirl beautifully, leaving it looking very messy.
Cream works far better than yogurt to swirl, but I prefer to use just what is in the recipe when I style – I don’t want people to make my recipes at home and then find they don’t look like my pictures because I use different techniques to style than they would at home.
I do think that one bowl, with these garnishes and a beautiful yogurt swirl would work really well, but with all 3 in the frame it is just too busy.
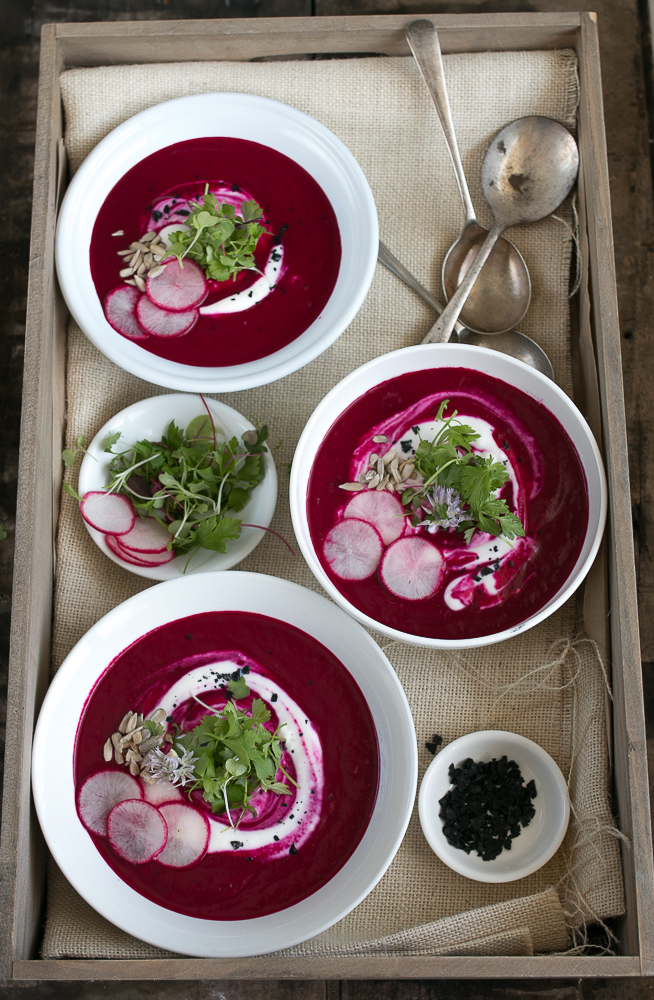 *Iso 250 35mm f4.0 1/160Sec
5. I took the garnishes off, poured the soup back into the blender, washed the bowls and started again
3 times over!!!
…and still I wasn’t happy with how it looked. ( if it’s not working try something else)
So I changed up the composition by shooting the bowls directly on a board and not in the crate.
I made the micro herbs in the little bowl spill over to create movement in the shot.
It still looked too busy to me so at that point I put the soup in the fridge, packed up and walked away. AAAAAH.
Sometimes when a shoot just isn’t working it’s better to come back to it with fresh eyes, another day. Sometimes you can keep the food to shoot again, sometimes not – but then you still have a good meal to enjoy yourself.
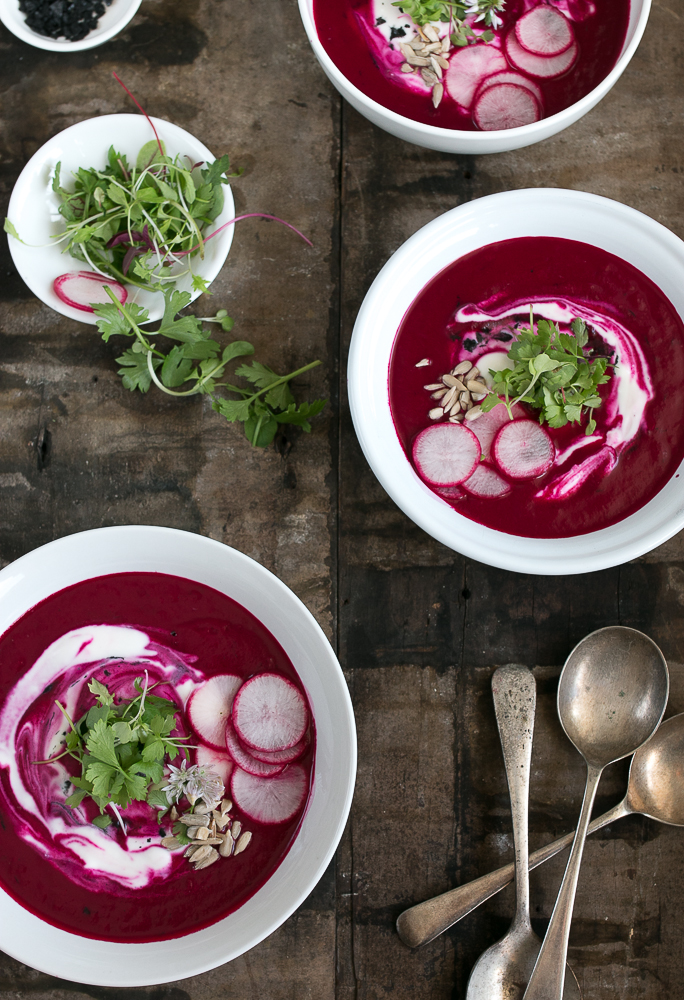 *Iso 250 35mm f4.0 1/160sec
6. The next day I changed my approach.
I wanted the shot to be simpler.
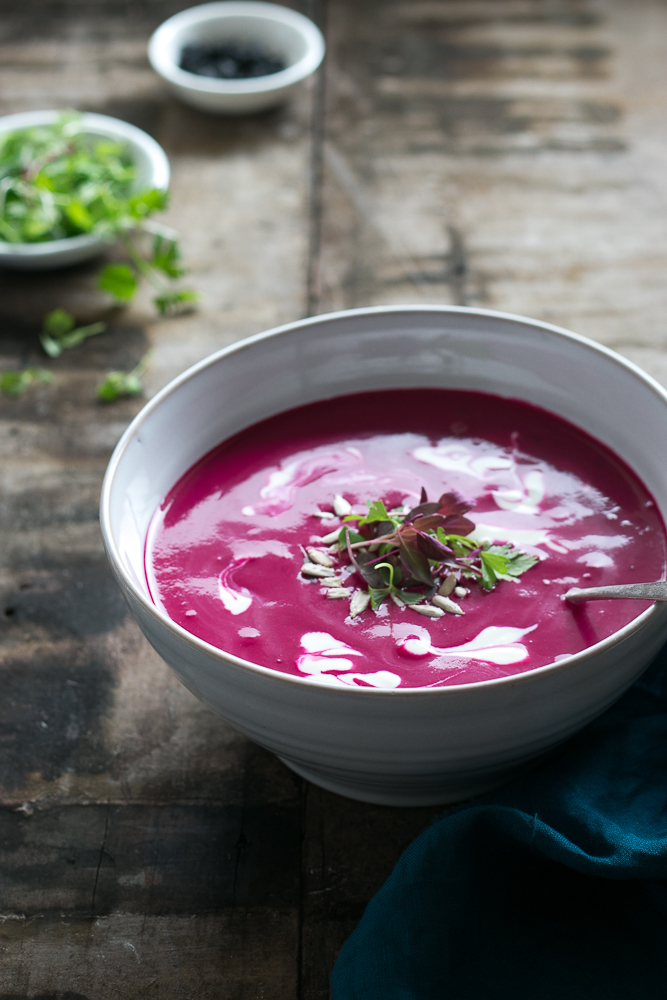
I chose one larger bowl instead of 3 smaller ones and still used the same garnishes in the soup and the shot (minus the radishes – they didn’t really make sense to the recipe anyway) except this time I used slightly less in the bowl itself.
I added a little lemon juice to the yogurt to make it slightly runnier so that it would swirl better ( the recipe calls for lemon juice so that is acceptable) and I decided to try the first take with just a dollop of the yogurt off the center of the garnish.
I dropped my table so that the light would stream in at an angle, backlighting the soup, but not creating too much of a shadow from the lip of bowl.
( I use a table from Office Works that cost about $80 to shoot on because I can adjust the height of it. I also keep a step ladder in my “studio” so which helps with overhead shots and getting a good angle on the food.)
I chose to shoot at more of a 45 degree angle rather than overhead to capture the sheen of light over the surface of the soup and I didn’t use a reflector because I really liked the shadows cast by the bowl.
I added a spoon and the napkin in the bottom right of the frame so that when reading the photo the eye is drawn in there, moves up through the soup to the bowl of micro greens and leaves the shot through the black salt.
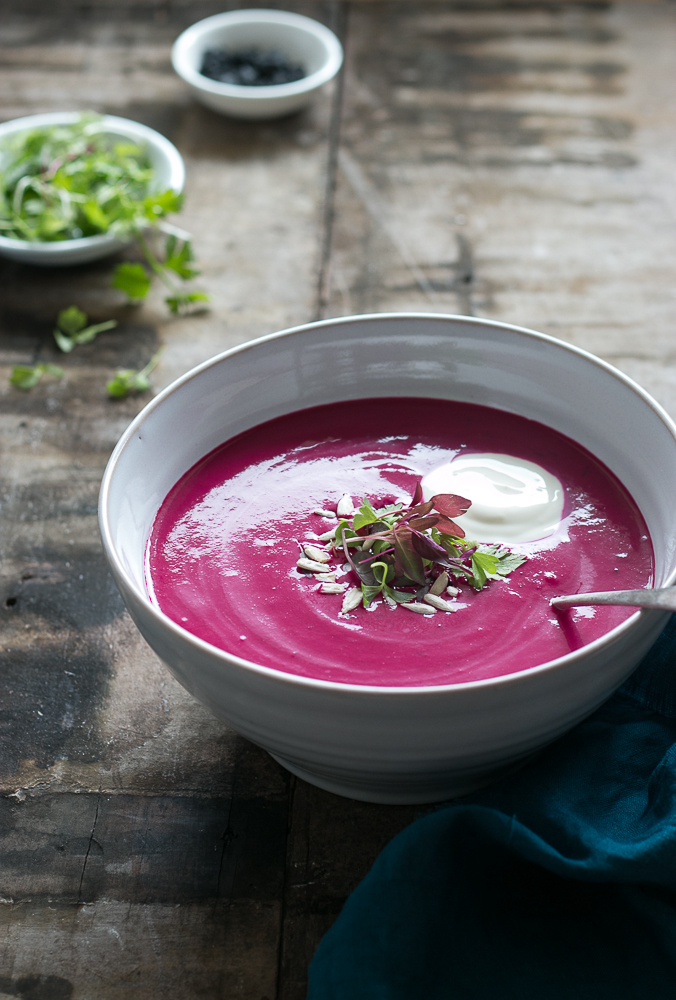 *Iso 320 50mm f4.0 1/80sec
7. Once I knew I had the shot I wanted I started to play around with the yogurt.
So again I removed the garnishes, poured the soup back into the blender, washed the bowl and started again. This time instead of using a spoon to swirl the yogurt I dotted the soup with a few dollops of yogurt, then I used a chopstick to swirl.
I found that if you fully submerge the chopstick through the dollop of yogurt and then move it, the yogurt won’t mix with the beetroot soup so you can create more of a neat pattern. This is a good tip to know because sometimes you can’t just pour the soup back and start again.
 * Iso 320 50mm f4.0 1/80sec
8. Now I had 2 images to choose from and neither of them required much editing in Lightroom. All I did was to bump up the whites, increase saturation of the greens and increase the contrast ever so slightly to add texture.
*All of these images were captured using a Canon 70D
Let me know in the comments below if you found this helpful and if you would like me to do more behind the scenes posts.
- 6 large organic beetroots, trimmed and washed (not skinned)
- 400 ml chicken stock
- 2 Tbls lemon juice
- 1 Tbls apple cider vinegar
- 2 Tbls chopped dill
- 120 ml Greek yoghurt + extra to serve
- salt and pepper to taste
- 1 handful micro herbs
- 1 handful sunflower seeds
- Bring a large pot of water to the boil, then add the beetroot and simmer for 60 minutes until tender (smaller beetroot will cook quicker). Remove from the heat, drain the water and let the beetroot cool until easy to handle.
- Remove the skins (they should come off quite easily if just nudged with your fingers). *wear plastic gloves if you are worried about the beetroot staining your hands.
- Cut the beetroot into smaller chunks, then add them to a food processor along with the stock, lemon juice, apple cider vinegar, dill, yoghurt, salt and pepper.
- Process to a very smooth consistency, then test seasoning and add more salt/pepper if necessary. Remember, cold soup will need more seasoning than hot soup.
- Refrigerate until ready to eat.
- Serve cold or at room temperature with dollop of yoghurt or cream, some micro herbs and a sprinkling of sunflower seeds.


wow who knew so much went into crafting that perfect shot! Thanks for the tips!
Thanks Bec. Luckily not every shoot takes this much. xx
I love this! I struggle too… Thanks for sharing 🙂
Thanks Sophie. At least I finally arrived at a point I was happy with. There are plenty of shoots that lie on the cutting room floor, but I find I learn the most from those. x
Love your photo’s, so it is great to see what goes on behind the scene.
Thanks Rachel it’s so great to share what it looks like behind a photo. x
Loved this article Jo! Im just learning with a ‘real’ camera so this was great for me!!! Your work is so beautiful, and the recipe looks stunning too! Thank you and I would welcome any more posts such as this 🙂 x
Thanks so much for the feedback Kelly!! I love your recipes and your site. xx
Someone who is as much of a perfectionist as me!!! I love your style Jo and it’s so great that you’re prepared to share your knowledge and insight with others.
Thanks Chris. You know when I started taking photos of food I would devour any information I could get my hands on so it’s great to be able to share what I learnt. x
Gorgeous! What lens did you use?
Hi Hilary for the overhead shots I used a Sigma 35mm f1.4 and for the 45 degree shots I used a Canon 50mm f1.8. I use the 50mm f1.8 for most of my food photography except when shooting overhead. xx
Jo, I’ve seen you work and i know how much love goes into your pics and yes they do show it too! BUT WOW, a lot of work in this hey? Totally understand and get it though, cause i do the same – except with an iPhone!! haha
Thanks for the extra tips lovely lady. 🙂
G x
Such a pleasure darling! Thanks for reading. xx
Wow, Jo I really enjoyed seeing more of your process. There are so many tips out there but I really loved how specific these were. It’s so heartening to know that it can even take a pro a good couple of attempts to get it right! x
Oops! Managed to spell my own name wrong haha!
I really enjoyed reading this Jo! I love your style and how specific your tips are. It’s so heartening to know that it can take even a pro a good couple of attempts to get ‘the’ shot. x
I love the photos of your blog, I discovered the blog recently thanks to pinterest and am a big fan. Congratulations!!!!!!
What a gorgeous soup! I am always so intrigued by other photographers methods, so this post was a fun read! Awesome job!
Hey Aubrie I recently discovered your beautiful blog when I was checking out other Foodie themed blogs through Shay Bocks’s site and I just love your style and your photography. xxx
Hi Jo,
I’m first time visiting your blog thanks to the striking photo of this beetroot soup…
The whole post is really inspirational, and above all, I have beetroot from my garden waiting
to be used. I never eat beetroot with the skin – but now I will 😉
Hey Jasmine I’m so glad you found this inspirational. I love learning how other food bloggers do it so I thought it would be great to share. (you just cook the beets with the skins on and then remove the skins before blending 🙂 Beetroot fresh from your garden is there anything better?
Woah! You put so much thought into everything before hand. I usually just throw stuff on my backgrounds and start taking pics…and then wonder why I always have to start over haha
Awesome pictures btw! Since I’m going through a beet obsession right now, I’ll def be trying this out 😀
Love your behind the scenes posts! Just wondering where is the best place to get your hands on those old chipped wooden boards that you use for a background in your shots?
Hi Kerrie I source old wood from second hand timber yards and then my hubby makes them into boards for me. Some boards are just plain wood from the hardware store that I’ve painted myself. Hope that helps. xx
Thanks for sharing Jo, loved the behind the scenes, was so helpful. I attended your workshop yesterday & thoroughly enjoyed.
Thanks again 🙂
Beautiful photos! I have a garden full of beets and I’m going to make your recipe. Thanks!